A new stable release of MOPs is available! The Experimental build already supported Houdini 21, but this was confusing for new users, so that update (plus some others) are now merged into the main branch. Details here:
https://github.com/toadstorm/MOPS/releases/tag/v1.11
-
MOPs v1.11 Stable
-
Introducing MOPsCam
I’ve been working on this one for quite a while, and it was a lot of work to get the UI tightened up and working smoothly, but it’s finally ready for release: the MOPs+ Camera!
This is a KineFX-driven camera rig with all kinds of fun controls, fully interactive in the viewport. It’s designed first and foremost to be fun to use, but also to make it easy to animate realistic movement. There’s a lot of subtle stuff in this rig to make it behave like a proper camera rig should without fussy controls or counter-animation. Here’s a quick tour:
The camera and optional crane rig both have fully interactive viewport-driven controls thanks to Houdini’s Python viewer states. Almost every part of the rig can be easily animated without needing to mess with the parameter interface.
The camera itself (both with and without the crane) has a built-in adjustable nodal offset. Default cameras in Houdini rotate right around the film back, giving you a very CG feel when panning the camera. The nodal offset changes the rotation pivot to any custom position, rotating much like a real film camera would on a tripod or crane.
The crane rig includes a handy gimbal option that keeps the camera level while rotating the boom or column around.
There’s also easy controls for placing and animating the camera on a track curve. Any offset from the camera rig to the track is preserved so you can make easy adjustments.
There’s also a simple built-in depth-of-field control with an optional visualizer that shows you exactly where the focal plane of the camera will be. You can focus at a constant distance, or choose an object to be your target, then use the viewport controls to fine-tune the exact distance as needed. The frustum geometry can be exported to a separate SOP network with a single click, too, for easy frustum culling!
Finally, the whole rig is driven by KineFX, and with a single click you can export the rig to a separate SOP network that the camera will read from. Animate the crane rig to rough out your camera, then open up the KineFX geometry directly and go nuts! If you don’t like the built-in camera shake, create your own with Houdini’s native SOPs or use MOPs+ tools however you like.
I think this is going to be a really fun tool for all you animators out there!
Other updates
There’s a few other important fixes in the new update, too. MOPs+ Waveforms has been updated to unify the apparent wavelengths of the different wave functions so they have peaks and valleys at equivalent places. MOPs+ Camera Blender gets a few bugfixes and introduces smooth interpolation for 3 cameras (previously you needed 4 to get a smooth curve). MOPs+ Typography now has controls for tapering and twisting in the extrusion process. There’s a few other minor tweaks and quality-of-life fixes detailed in the changelog.
The only downside to all this is that in order to get the full functionality of the Python state handles in this camera, I’ve had to update the minimum Python version of MOPs+ to 3.9, and the minimum Houdini version to 19.5. I think most users like to keep more up-to-date than that so I hope this isn’t a dealbreaker for any of you.
The new tools are out right now, so get downloading and have fun!
-
MOPs v1.10.2 Experimental
It’s time for another open source MOPs update! It’s a small revision but there’s some fun stuff in here that ought to save you some time.
First of all, this build adds full compatibility for Houdini 21 / Qt6. There was really just one deprecated
import PySide2statement in the creation script for most MOPs tools that I was too lazy to remove entirely, and that’s out now.Second, I’ve added a little quality-of-life upgrade to MOPs Set Sequence Time. When setting cycling modes or frame numbers for Alembic sequences, MOPs now automatically reads the start and end frames of your packed Alembics so you don’t need to define them yourself… just set a cycling mode if you want and you’re done.
Third, and possibly most fun, I’ve added a “Cycle” toggle to most Falloff nodes. Just enable “Cycle” and then animate the “Cycle Offset” parameter and you can quickly get all kinds of funky looping effects on your falloffs.
You can grab the new release on GitHub here.
MOPs Plus update
I also just uploaded a Qt6 hotfix for MOPs Plus, Python 3.11. This just fixes up some Qt-related code in MOPs Typography, MOPs Attribute Mapper, and MOPs Sequencer that changed between Qt5 and Qt6. You can grab the new release from your MOPs account’s Downloads page if you have a current subscription.
More new MOPs+ stuff is on the way… hoping to show a sneak peek soon.
Have fun!
-
MOPs v1.10.1 Experimental
A new Experimental release of MOPs is now available! This is mostly just minor bugfixes and QoL improvements. Details on the release page: https://github.com/toadstorm/MOPS/releases/tag/v1.10.1e
-
MOPs+ new release!
Hi everyone! Life has been extremely crazy lately so the release has taken a bit longer than expected, but it’s ready to go now.
One of the biggest changes is the previously-mentioned MOPs+ Collision Geo 1.1, which greatly streamlines the interface and replaces the old Tetrahedron collision geometry option with a much more efficient Voronoi-based method for selectively adding cells in concave areas. It should be a lot easier to use now, both for active and passive colliders.
The other big update is MOPs+ Rig Aim 1.0, a brand-new tool for rotating KineFX joints towards a target vector or goal position. You can use this to bend limbs, chains, branches, all kinds of things without worrying about complex spline IK configurations. It’s deceptively easy to use and supports falloffs and joint limitations the same as the other MOPs rig nodes.

Paul demonstrating surprising flexibility in aiming towards a target! Using falloffs or joint limits creatively can get you all kinds of interesting behaviors. In this case, the joints in this chain are never allowed to rotate completely towards the target object, creating a curling effect:

Using MOPs+ Rig Falloff to prevent the chain from rotating directly at the target to create a curling effect. MOPs+ Rig Aim can work on pretty complex joint structures. For example, here we’re bending an L-system tree that’s been converted to joints, using a combination of Rig Falloff and Noise Falloff driving an aim vector pointing towards screen left:

Rig Falloff combined with Noise Falloff to bend an L-systems tree towards screen left. I’m really looking forward to seeing what artists do with these new tools!
There’s a few other minor bugfixes included, too, related to the Camera Blender and the Activator shelf tool. You can see all the details on the changelog page.
Have fun and please feel free to leave comments and suggestions here or in my email.
-
MOPs+ Rig Aim
It’s been a little while since the last release and I wanted to add a brand new toy to the next one that would be fun for animators to work with. Here’s MOPs+ Rig Aim! It’s a lot like MOPs Aim but it works on KineFX joints:

MOPs+ Rig Aim operating on the spine joints, with falloff from pelvis (0) to neck (1) courtesy of MOPs+ Rig Falloff. It operates in order from root to tip on any joint chains you apply it to, so you can use it to gradually bend complex hierarchies towards a target. It’s not too difficult to bias a single KineFX joint towards a target orientation, but doing it to multiple joints and having them solve their aim vectors in order so they don’t overshoot is a bit more complicated!
Of course there’s plenty of snags to work out… not every rig is cleanly built, and sometimes you’ll end up with joint orientations that point in opposite directions when mirrored. That leads to all kinds of
brokenfun interpretations when aiming multiple joint chains:
Aiming the arms as well as the spine. Looks like the right arm’s aim axis is mirrored instead of the up axis… This will take a bit of work to tune up and built a coherent interface for, but I’m looking forward to finishing it up so I can push the next release! I think it’ll be a really entertaining way to art direct more difficult kinematic chains for things like tentacles, trees, or other weird wiggly things.
Stay tuned!
-
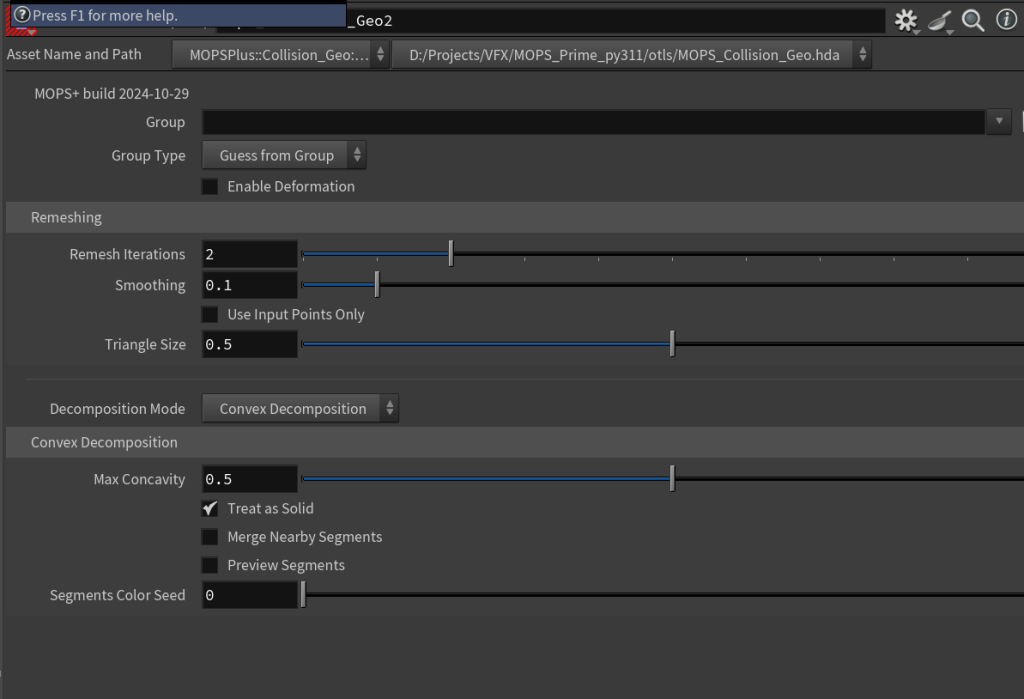
MOPs+ Collision Geo 1.1
I’m reworking some of the internals of MOPs+ Collision Geo, a SOP that’s meant to simplify creating lightweight Bullet proxies for packed primitives, including deforming sequences, while ensuring instanced geometry is only simplified once. This means you can create a big mess of instanced objects and have consistent collision representation for all of them in one go, without having to reorganize anything about your network. It’s very quick in most cases!
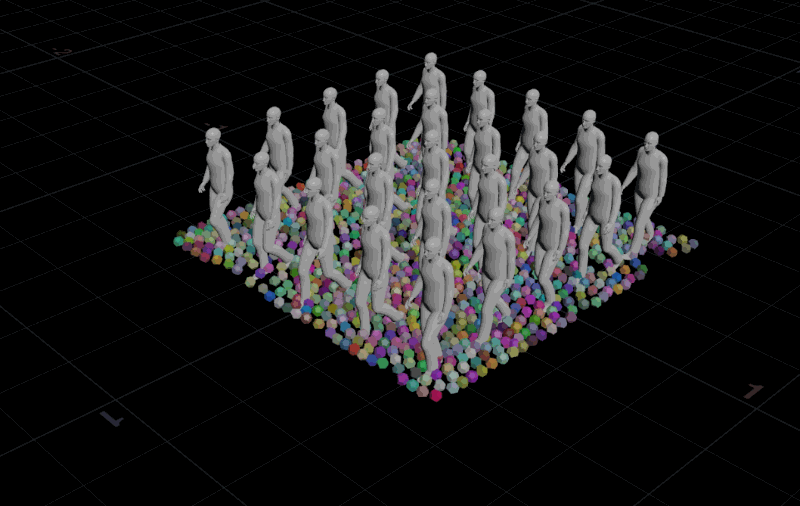
The proxy geometry is only created once and then instanced and deformed to match the incoming instanced sequence. Version 1.0 was working pretty well, but it felt a little clunky in a couple places. First of all, while the Convex Decomposition mode worked great in most cases for breaking geometry apart into convex hulls, the alternative Tetrahedralize mode was just far too slow to be worth using in anything but the most extreme cases. The idea was to turn complex objects into tets that are inherently convex, but in practice you had to generate so many of them that it was never worth the effort.
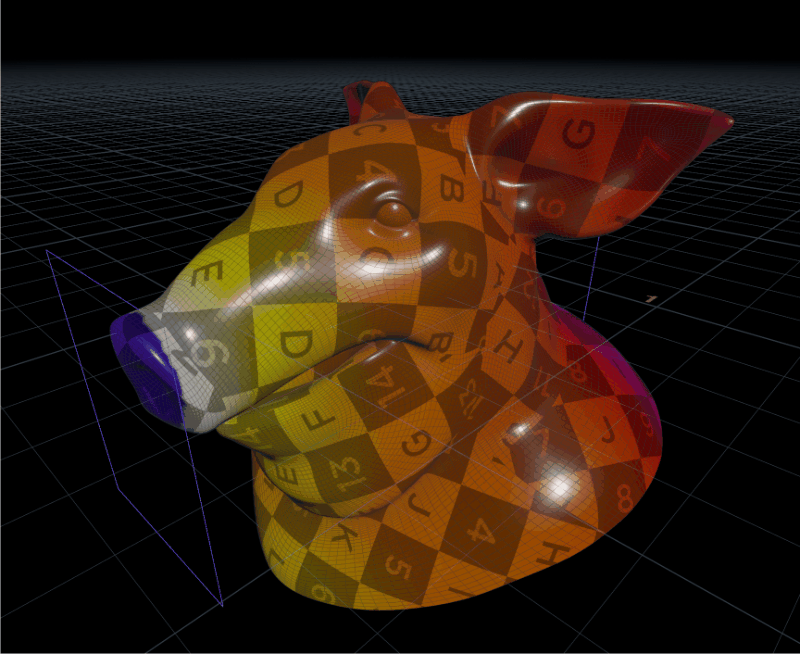
Thanks to a very cool video presentation by Lewis Taylor, I decided to replace that old mode with a new one that utilizes his described method to efficiently add more Voronoi cells for fracturing where the geometry is more concave. This means that the more convex parts of your mesh can be fractured with less points, which results in less chunks in areas where you don’t need them. It’s pretty brilliant in its simplicity!
Note how there’s more pieces in the inside edge of the neck, eyes, and ears. These areas are more concave and so need to be decomposed further for accurate collision representation. The parameter interface also needed a bit of cleanup to make it easier to get to the most relevant tweaks more quickly. I was removing all the Tetrahedralize options anyways, so it made sense to give the whole UI an overhaul. I mentioned this in my latest Houdini HIVE presentation, but in general I try to set up interfaces to work top to bottom, left to right, big to small, so that the broadest options or the first things to consider are handled first, and the fine-tuning or finishing options are encountered later.
The old MOPs Collision Geo 1.0 interface. 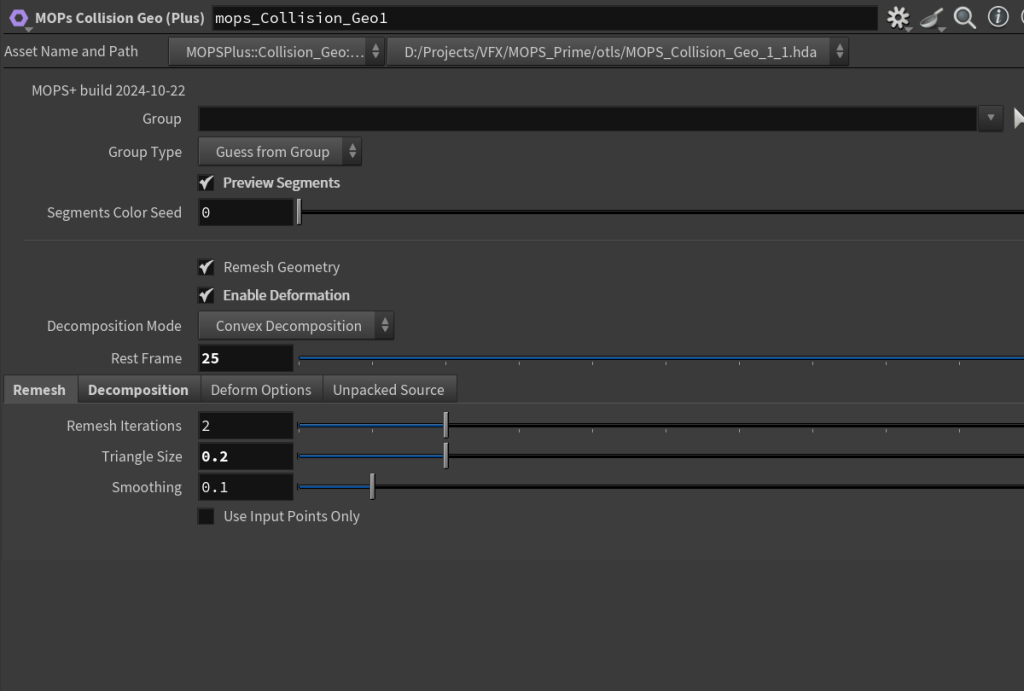
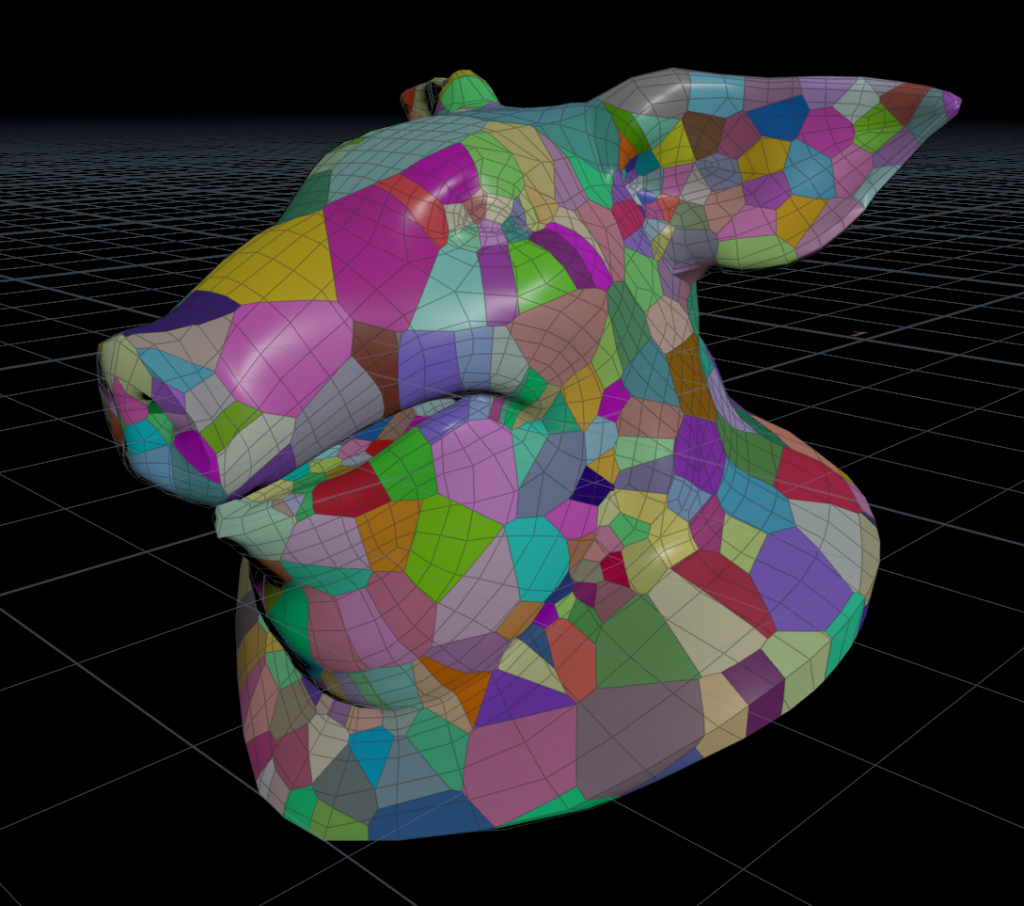
The MOPs Collision Geo 1.1 interface. It’s a subtle difference, but much easier to read! The other big thing to handle was improving how the operator handled incoming geometry that wasn’t instanced… in version 1.0, the operator would simply fail and claim that all input geometry needed to be packed. From the developer’s perspective this made sense, but to an end user it was just another hurdle to worry about. I’ve since rewritten a number of similar nodes that used to throw errors when the “wrong” input was given (such as geometry with no
idattribute) and instead just throw a warning and try to handle the conversion within the SOP. I think it’s a much smarter way to go, as it allows the user to maintain flow and interactivity while still letting them know that they should be on the lookout for weird behavior just in case.Here’s a quick example showing the new MOPs Collision Geo operating on both packed primitives and a polygon-based collision mesh that’s deforming. There are two types of instances that are randomly position, oriented and scaled, and MOPs knows to create only one decomposed proxy for each type of instance and then transform and copy them to match. For the deforming collider, MOPs decomposes in-place based on a rest frame and then transforms the pieces to match the deformation. This is much cheaper than trying to use a deforming collider, which would have to be re-imported into the DOP simulation on every timestep.
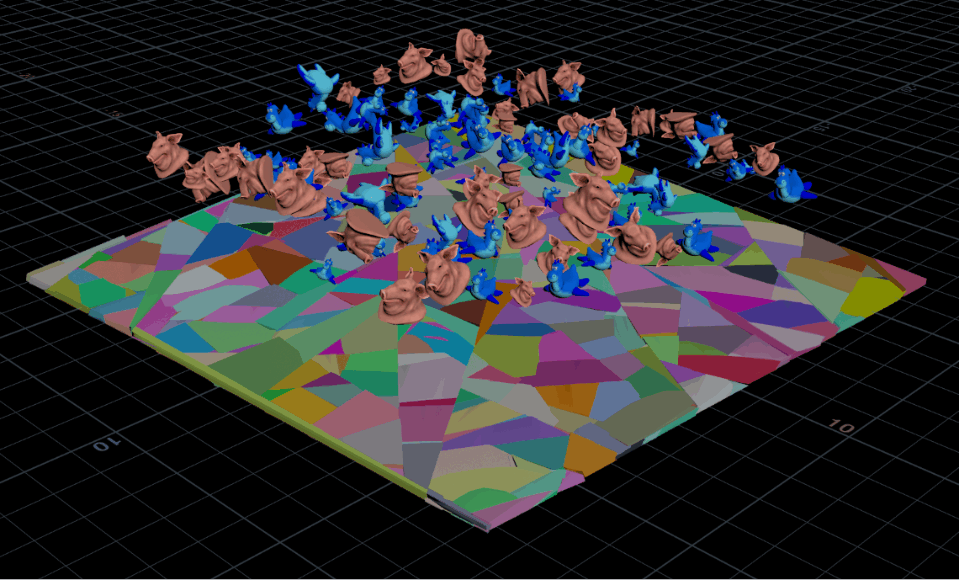
On my 9900X this runs at about 12 fps, and the Collision Geo SOP only takes about a second and a half on the deforming grid for the initial cook. The cook for the instances is basically instantaneous.
Demo Licensing
I’m also in the process of getting a trial MOPs+ license structure included. Getting this integrated with the website and MOPs+ accounts and all that might take a while, but once the new structure is up and running I’ll have demo licenses available by request. You know where to find me!
-
Welcome to the new MOPs dev blog!
I’m updating the format of the MOPs blog here to make it easier to post information about MOPs updates and development insights. The old static HTML format was nice and lean, but the template was pretty rigid and lacked options for search and RSS. I’d previously relied heavily on social media to connect with users and share information about updates and development, but as social media continues to implode in the race for ever-increasing margins, I thought it’d be nice to provide an alternative here. If you want MOPs updates to be delivered to you, just grab an RSS reader like Inoreader and point it to https://motionoperators.com/blog/ .
Looking forward to another year of making Houdini a little less scary!